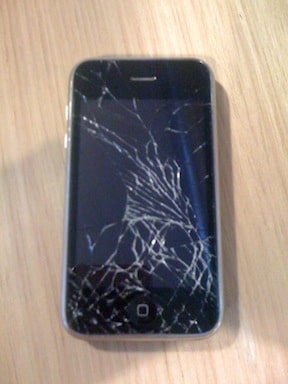
After about 3 years of dropping my iPhone 3G on various occasions, a drop onto the tile floor at Atomic HQ did her in:
I made a trip to the Apple store to talk to one of those certified Genius dudes. Pretty impressive Apple can draw people with such amazingly high IQs to sell their products?!?
Anyways, my genius was actually very helpful, although I found out that to have them fix it, I would have to pay $100, and they would basically replace the entire front assembly (glass, touchscreen, LCD, button, speaker). My other option was to go ahead and take advantage of my upgrade to an iPhone 4, though I know that the iPhone 5 is due out this Fall, and even the Genius was honest enough to point out that it would be best if I could wait. So I started looking for DIY options…
I found the glass and touchscreen together for $2.00 through Amazon! I ordered it, along with a toolkit that gives you the 3 necessary tools to go the surgery for another $1.60. Later I learned that the the glass/touchscreen kit I ordered came with the tools as well, though I wasn’t too saddened that I spent an extra $1.60. I was also told, to my surprise, that according to Apple store policy, I could bring any failed DIY attempts to the store and they would still fix it. Therefore, I decided to take the plunge and try to fix it myself.
I found the video below, which is actually pretty well done, though the guy in the video has done this before, and makes it look a little too easy. Basically, you do the following:
- Shut phone off (Duh?!?)
- Take the SIM card out (that gives you your phone number and service from your provider)
- Take 2 screws out (don’t lose them!)
- Use the suction cup provided in the tool kit to pull the glass/lcd assembly out of the phone (be gentle, and watch the video!)
- Disconnect the 3 small (delicate) cables
- Remove the LCD from the assembly by taking out 6 more screws (keep these separate from the others, due to differing size)
- Use a hair dryer or heat gun to soften the adhesive that hold the glass to its frame (on LOW!! more later…)
- Clean off the broken bits and pieces of old glass
- Use the adhesive sticker provided to attach the new glass
- Put it all back together
- Done!
NOTES FOR DUMMIES
- BE PATIENT AND GENTLE!! (my biggest problem)
- If you are skeptical of your abilities to do the glass replacement, spend the few extra bucks to get the entire cover assembly (below)
- I failed step 7 by getting too impatient that the adhesive wasn’t getting soft enough, and I used a heat gun for too long, which ended up resulting in melting the little dimple under the home button that rendered it nearly inoperable.
- I must have not reattached the cable to the LCD fully, and I ended up frying it!!! I had to order a replacement LCD for another $23 (and a new home button assembly for $0.60)
- If you’re an idiot like me and fry your LCD, the LCD kit you will receive will have a new LCD frame and the LCD itself which comes with an adhesive sticker to attach to the frame.
- The LCD, if you are replacing it, is very fragile. I was pressing down on it to make sure it was secured to the frame, and I cracked by brand new LCD! In the end, it still works fine, but has a tiny wrinkle in the image which has mostly disappeared (whew!)
All in all, I was surprised how easy the process was, though I would have been a bit more careful in order to avoid the second round of repairs. I especially had fun digging into the guts of the iPhone to see how they jam all that good stuff in there to make it work. If you feel up to the challenge, best of luck! Just BE PATIENT!
GLASS & DIGITIZER (TOUCH SCREEN):
- FAKE INTEL CORE I7 CPU
- BUILT TO LAST: COMPUTER SYSTEMS THAT SIMPLY CANNOT FAIL
- SOFTBANK BUYS EACCESS TO CREATE GLOBAL LTE BAND, EYES UP SPRINT AND METROPCS
- NEW ENCRYPTION METHOD AVOIDS HACKS BY SAVING YOUR PASSWORD IN MULTIPLE LOCATIONS
- BREAKING THE SURFACE: HOW MICROSOFT SET OUT TO BUILD THE WORLD’S BEST TABLET
- FREE UNLIMITED INTERNET CONNECTAN HACKED FOR ALL SIM USE ALL MICROMAX MODEM ENJOY FOR FREE DATA PACK


 Sunday, October 21, 2012
 Unknown


0 comments:
Post a Comment